Saturday, May 01, 2010

Free Envelope Pattern 2"x3"

I love envelopes! They are the best way to be able to add MANY photos to a single layout! And there is so much you can do with a single envelope! You can make envelopes any size you want. Adhere them on the background page any way you want. Make so many beautiful and amazing closures for the envelopes. And the list goes on.

Sometimes you have a lot of photos you'd like on a layout but can't possibly put them on on mattes and on the background page - Envelopes make it possible to put many photos on a single layout. Just make the size of envy you want and cut your photos that same size and BINGO! Slide the photos in the envelope and you got a fantastic layout with LOTS of photos!

Cut multiple sheets of cardstock the same size as the envelope and use them for journaling. You can say alot in one envelope!

Have some memorabilia or other little items you want on the layout but no way to adhere them to the background page? Slide them into an envelope!

Envelopes make for a fun, interactive feature to a scrapbook layout - it is fun and intriguing to "untie" the closure to see what's inside the envelope!

Use vellum, or cardstock, solid or pattern. Anything works! The possiblities are endless! And envelopes are so easy to make and you can make them to match any theme or style of scrapbook layout.

I found this pattern for a 2x3" envelope in my huge stock of scrapbooking supplies and things and thought I'd share it.


Also, if you look at this article, it has other options for creating and using envelopes. I have created all these myself. I love creating the closure - there is just so much you can do and so many ways to make the flap close to accomodate the layout! How To Make An Envelope

Click on the image above and it will take you to another page where you can save and print it. I tried to make it the size you could just copy onto an 8x10 sheet of paper and get actual 2x3" size of envelope, but couldn't figure out how to do that so you can just print it out as is and then make a copy and use the ENLARGE feature on the machine - or if you know how to enlarge it on your computer photo editing program, you could do it that way. This is not my original pattern. I know who is the the creator of the pattern, but I thank whoever did it!

How To Personalize your Scrapbooks Title Page

We all enjoy making scrapbook layouts and albums for ourselves, but often we like to make them for others. We work hard to make the scrapbook pages and layouts tell the story of the person, to capture the memory for that person. Sometimes easy, sometimes hard, but why not just start at the beginning.... WHO is that person?

Capture the personality of the person on the very first "title page".
If you have that very first layout about what makes that person "tick", "who" they are, the memories are sure to flow for you as the creator of the album and for the person as they enjoy perusing their lifetime and reveling in the memories of "their time" and often capturing memories they have forgotten. Sometimes you can even make a new memory of an old time for them. Something you remember about them, or things you did together, or the way you saw that person and what they meant to you. Alot to include, but pretty easy to do!

Sing us a song, you're the piano man.....remember that song?
I associate that song with my brother. He was/is the piano man. He took clarinet lessons in the 5th and 6th grades at school. He then stopped and never had another music lesson in his life. Mom gave us all piano lessons once, and the teacher turned him away saying he knew more than she did! My brother can play any instrument there is - all self taught and proficiently. But the guitar was his favorite. Had he had the opportunity, he could have been right up there with some of the great guitar players. He was that good. He couldn't dance a step, but the music was in his soul.

Since he is music, I used that as his title page to his scrapbook. I used die cuts of music notes, and cut strips of black cardstock to create the music staff lines. This is a 12x12 layout. I chose photos of my brother at different stages in life, mainly just pulling the best facial shots so that you could see him the best, since these little cirlces are a bit small. But I made sure I started with a photo near birth, and ended with a current day photo.

I used a circle cutter and cut the face of each photo just slightly smaller than the music note ball so there would be a black border around the face picture, then adhered the photo to the die cut. Quick, easy and so simple, but boy the memories it captures!!

As the "title" of the album, of course, music related. Instead of just writting his name and birth date (which I did on the next page) I titled his scrapbook album "Written and composed by...." A typical, musically known phrase. And so appropriate, it just completed the layout to perfection.

And there you have it. My brother, his music and his life. The exact reason for a scrapbook. The perfect collection and tribute to his life ... and all on one page! How cool is that!!

Tools used: Although one of the most powerful scrapbook layouts of memories, this is one of the easiest and quickest layouts to create. I used a paper trimmer to cut the strips for the staff lines. I used a circle cutter to cut the photos into circles. Both of these you could do without tools, just free hand! A glue stick, a scrapbook marker pen and a letter stencil - again, you could do free hand.

Tuesday, December 15, 2009

A Letter From Santa Claus - Wow! What a Memory!

How about a memory from Santa Claus! What a scrapbook layout that would make! And years from now, your older child, will look back and have a great memory of Santa!

I did this last year - paid someone to do it, but this year I asked around and got the "how to" to do it myself! Here is my plan for today! I have not done this this way before, but it doesn't seem to be a problem. It is a common thing for this post office to do, so I am going to give it a try!

YOU write the letter to your child or grand child "from" Santa. Find some nice stationery - google: stationery and see what free things you can find. Just make sure you use stationery that the child DOESN'T know you have! Or just go to Michael's or Joanne's and choose some 8x10 Christmas themed sheets to print on.

Create the letter from Santa's point of view. Inlcude things specific to the child that "Santa" would know. Mention family, friends, their pet, school, anything that is important to the child and would be something that "Santa" would know. Of course, include things the traditional things Santa would say like, "I know you have been good this year" or "It was very nice of you to have helped ___________this year" or "I know you had some sad times this year, but I will bring you some holiday happiness........" Anything that will relate to your child specifically.
Of course, sign it with a beautiful signature by Santa!

Choose an nice festive envelope and address the envelope to the child. Place a stamp on the envelope. Go to the PO and get some holiday or christmas themed stamps. Something the child has not seen!

NOW>>>>>>>>>>
This late in the game you might want to use USPS Priority FLAT RATE Mail - ($4.05 and 2-3 business days)

In the Priority FLAT RATE envelope (free at the Post Office) place your sealed and stamped letter(s). In this case you can write letters to many kids, place in their own envelopes and place ALL of those letters in the same Priority FLAT RATE envelope. It is $4.05 for as many as you can fit in the envelope and the envelope close properly. Great if you have a group of kids!

Mail it to:
North Pole Christmas Cancellation,
Postmaster,
5400 Mail Trail,
Fairbanks, AK 99709-9999.
The post office there is perfectly accustomed to this, and will take care of opening the Priority Mail envelope you sent the letters in and mailing the individual letters for you to the children.

On that surprise day - the little ones get a letter from Santa! I can already hear the squeals of excitment and wonder! Have your camera ready for that wonderful photo of that adorable face when they open the letter!

THEN........... after Christmas......... a scrapbook layout is created! And all you have to do is make a pocket for the letter so it can be taken out (repeatedly I am sure!) and looked at, matte the photo(s), add a title, and you are done with a most wonderful and precious memory!

10 Free Scrapbook Supply From the Christmas Holidays!

Free scrapbook supplies are all around you this holiday season! There are not hard to find, you just have to be creative and look around! In a way, these are cheap scrapbook supplies! Someone else's trash is a scrap booker's treasure!

Here are 10 things that can be used as scrapbook supply that you might keep your eyes out for. Just think… you'll have some great new supplies ready and waiting to create your Christmas themed scrapbook layouts! And they will have the additional memory of "where" and "how" you found that particular scrapbook supply!

Gift tags - These are cute to use "as is" in a scrapbook layout. If you have any extras, don't throw them away or store them for a year. Use them on your Christmas themed scrapbook pages! They come in all shapes and sizes, so you could even pick up a package on the After Christmas Sales! They are perfect for the title and date. You could add fiber hangers to embellish them a bit better. Or you could just cut off the little end that has the image on it and use it as a sticker! Add a pop-dot and the sticker is now 3-D! Line several of them end to end along an edge of your background paper and create a border! Use them to "name" the photo. Often the tags say "Merry Christmas" or something so just add the person's name and you have your photo description!

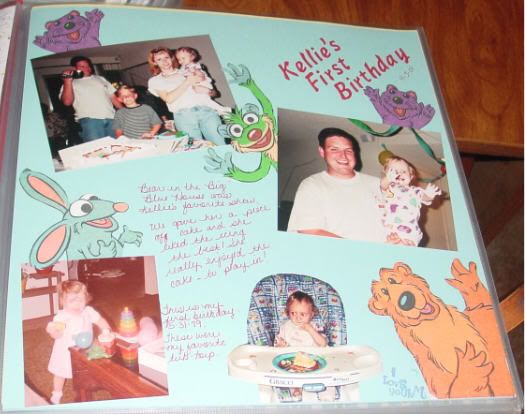
Paper plates and napkins - Just cut out the design or image and use them as a sticker-style embellishment! I cut out these figures off of the napkins and used them sticker-style and they worked out great in this layout if Baby's First Birthday - a character over each photo!

You could even make your own background paper out of the napkins. They are thin and with some glue, you could cover the full page with the design and then add photos over that!

Ribbons - Those thin curly ribbons are great for making tag hangers, confetti or lines pointing to something. You can get several colors and weave them together to make a photo matte or a square embellishment for the scrapbook page. Thicker ribbons are great to make borders or frame a photo, Take a small length of a piece of ribbon and using gel pens, JOURNAL on it and place it under a photo for the photo description. Ribbon is great for tag or envelope pulls. The thick, red, velvet ribbon would be a great enhancement to a Christmas themed scrapbook layout!

Family Recipes - I would probably say that no one is going to give you their recipe card, but jot the recipe down while you are there and then check out some of these great freebie sites that offer free recipe cards. Some you can type the recipe then print it out, but others you print out the card and then use your own handwriting to write out the recipe. Not only will you always have the family recipe for that wonderful dish, but it now becomes a memory to be passed on to generations so it can stay in the family!

Wrapping paper - Cut out the designs and use them as die cuts on your scrapbook layout! You could also make envelopes out of the beautiful wrapping papers. Click here for the pattern.

Envelope Pattern

Depending on the paper, use it as the background paper. (Acid-free issue at your own preference). There are some papers that have a beautiful scene on them - like a snow scene or a fireplace scene. Cut that out (silhouette it) and use it for the embellishment on you scrapbook page. Add glitter or other "add-on's" to dress it up or make it stand out. To make additional safe guards for the acid-free issue, you could laminate the front side and then run it through a Xyron sticker machine, then stick it to cardstock and cut it out, then run it through the Xyron machine again. This covers the front and back of the wrapping paper item and if there was an acid issue, now there is not!

Christmas Cards - What a great place to find images to use as stickers! Silhouette-cut an image to use as a sticker and use pop-dots to raise it up a little bit for a wonderful 3-D effect. Cut the INSIDE of the card out creating a frame and use that frame portion to frame your photo or journaling. If you really want to keep the card for a sentimental reason, don't cut it up; just use it as the embellishment on the scrapbook page. Adhere it to the background page and put a slice in your page protector and it can be opened while admiring the page!

Tissue Paper - Tissue paper adds a bit of delicacy,and frill. Use is similar to as you would vellum. You can crinkle it up and the smooth it out and add it to a tag or other punch art item. Or just keep it crinkled for the 3-D effect. In this layout I used it to make cotton candy!

Use your imagination on this one. You can crinkle it and twist it to make a "fiber" type of thing or crumble the edges only and use it to frame a photo. Scrapbook supplies can be created out of most anything!

Window Clings: Odds are they won't hold up till next year, plus, do you really want to bother with all that packing and storage over a few little clingies? Scrapbook them! Depending on what they look like, use glue or double sides tape runner to adhere them to the scrapbook layout page. You might treat them like Vellum as far as the adhesive goes so you don’t see the glue through the clingy.

Tiny Ornaments - Seems to be a common thing now, that stores carry these little, tiny ornaments that are figurines. They come in sets of 6 or more and they are a theme and are about 1 inch tall. A cartoon character and his friends, 6 different styles of snowmen or trees or several styles of reindeer. So many to choose from! These are great embellishments for "hanging" from your scrapbook layout! Use the hanger that came with them and string them across the page. So many ways you can use these little treasures!

Other household decorations - Do you really want to store all that for next year and probably not even use it again? Take your scrap bookers eye and look at it and see what you can cut, silhouette, adjust, take part of, or whatever else you think of to do to use all or part of that decoration in your scrapbook layout.

Just have a look around and see what you can find. Remember, collect it now, and if you can't think of a use, you can always trash it later! But while you have the opportunity to collect some free scrapbook supplies that will help you create some wonderful scrapbook page layouts, why not take advantage of saving some money, while you save your memories!

Saturday, August 08, 2009

45 Years of Memories - And I Organized Them Quick and Easy!

After 45 years of pictures, I finally got an album of my OWN LIFE done. I had tons of photos (and slides!) and made a "My Life" album for each of my 3 siblings and one for each of my parents and one for each of my own kids, but never got to my own life. When I got the urge to do my own Life Album, I just wanted to get it done and have it before something distracted me again and I'd never get back to it.. So I gathered all my photos, black and whites too, and got started!

I started by doing a Personalized Title Page. this one is for my brother - he was a fantastic musician all his life, so I hand cut the musical staff and found pictures of him (his face only) at different ages in his life, and with a circle punch, made the face circle the circle part of the musical note.
Photobucket

How Did I Organize 100's Of Photos From 45 Years?
Well, it was actually pretty easy. I chose to organize them according to the HOUSE we lived in. We moved around alot and I remember the house and the schools I went to for the time periods. For instance, I remember going to Sierra Vista Elementary School when I lived in Fullerton and I was in 4th and 5th grade. The year? I didn't remember. We did alot of camping and long camp trips - the year? Don't remember, but I certainly did remember the trip and things that happened. Holidays? Again, no year, but look at all of us in the photo...remember about that present or that tree or......


How Did I Manage The Memories?
That is one thing that is hard to do - you go through life and think "That was so wonderful, I'll never forget that!". Well, unfortunately, you do forget over time. I looked at the photos and some I could remember and some I couldn't. We are talking 45 years ago here! So instead of trying to make a memory for each photo, and since there were alot of memories I had and some had photos and some didn't, I decided to journal ALL that I could remember about the time period of each set of photos ! By that I mean, I just sat down and brain-stormed about the "house" or "school" time. Not only things that I remember about myself, but also about my siblings, the house, the school, friends, places we went, holidays at the time - anything I could remember for that period of time. Many of these layouts are 4 page spreads with the journaling as the middle page!


How I Organized It
After my brain storm of memories (few tears and smiles included there!) I went back and I grouped several memories about similar events or times. I put all the memories about my siblings together, then about my friends. I just organized it into a bit of EVENT sequence.

Below is a 2 page spread of "the years". With four of us, Dad always had us posing group style wherever we went... so 4 "Group" photos per each of the 2 pages... covered 18 years!

Photobucket


This is time spent with my grand parents and what I remember about those 2 wonderful people and that wonderful house grandpa built with his own hands! It is a 4 page spread with journaling and photos on all pages.
Photobucket


Then I Just Made It Look Nice!
I found a fun font and use a color ink and printed it out on cardstock. Depending on how many memories I had, some pages were 8x10 fully, others were only half a page long. I decorated with stickers and put it in a page protector. The ones that were half a page long, I just cut down the page protector to match the half page. Some pages just have matted photos and journaling - quick and easy!

It might not be this great and wonderful chronologically specific scrapbook, but it does have my memories and that is what really matters. Actually the AGE or YEAR isn't the topic of the memory, it is the EVENT and what happened that you are wanting to remember, not really how old you were or what year it was. I look at this album often. It is nice to just remember.

Thursday, July 02, 2009

When Journaling Captures the Memories

My brother took me to Cocoa Beach one summer. It was FANTASTIC! The view of the beach from his balcony was AMAZING!!! I can still hear the waves crashing to shore and I see the cruise ships heading out to sea!!! And to relax in the silence and just hear nothing but waves... boy, what a relaxing time! Something that I have never done before!

Journaling Captures the Memories

Photos are nice but they just don't always capture the experience. A photo of the ocean is a photo of the ocean. Nothing specific to point out. But my feelings and emotions ABOUT the ocean were so strong, in this case the memories couldn't be accomodated by photos. That is when journaling became the point of memory.

The Title Page and Photo Letters

Title Page: I had seen this letter technique and decided it was time to use it. I took a photo of the ocean, and using a 3" tall by 1 inch wide stencil (got it in the art section of the craft store - no where near the scrapping section!) I turned the photo AND the stencil backwards. Now I am tracing the letter backwards on the back side of the photo. Make sure you do the word in spelling order even though you are tracing them backwards. This way, when you turn them around, the letters spell out the word and the picture scene stays correct. Now I have FLORIDA spelled out in an ocean view!!! I purchase a pattern paper of clouds and glued them on adding only a die cut of a sea gull. Quick, cute, perfect and wonderful!!!


Because the journaling was so much, I chose to use the computer to type it all out. I chose a nice "relaxing" style of font, chose ocean blue for the print color and they just started typing my memories on white cardstock. If you look at this photo - you'll see a little sea-scene at the bottom. I wanted to break up the journaling a bit, so I created this little scene with punchies. I tore the paper to make it look like "sand" against the blue water.


The opposite page, is a pattern paper of the sea shore and on top of that I just matted (with differnet matching colors) 2 photos for where I stayed so as to "start the story".

Again on this double page spread, I have included lots of computer journaling. I chose the color to match the colors in the photos and also used those same colors to create the "shadow box" of sea shells. I picked up a few crumbs of broken shells and brought them back with me. Made this shadow box out of page protector plastic and a picture frame die cut. How easy is that! And the memories!!


The weather there was so amazing! It was nice and pretty and then in minutes went to windy and then the clouds rolled in and the rain started! I couldn't believe it! And I took these pictures mainly of the sea gulls, but later noticed that if i put them all together I got that weather sequence that I remembered! And I didn't even realize it at the time that I was taking them like that. I was just taking of the birds because there were so many! But look how great it turned out! I double matted the photos, in brown and blue to match the colors in the photos and then did computer journaling talking about all the feelings I had at the time. The scan doesn't show the beautiful colors but they really are beautiful!


So remember..... journaling is so important! Don't think that you can only journal ABOUT the event. Journal your FEELINGS about the event. Often those are more important or more powerful than the event itself!

Monday, May 25, 2009

How To Find Scrapbook Supplies at a Yard Sale

Scrapbooking is a huge and quickly growing cottage industry craft. I have been involved with scrapbooking for 10 years. It is amazing how it has changed. From simple to ornate, from flat to bulky. "Anything goes" in scrapbooking it seems. Acid free is a concern, but even with that issue, the embellishments and supplies currently on market are addressing that so you don't have to! New supplies come out every month, if not every week. I go to craft stores in my area and just browse the scrapbook isles and every time I go, there are new features, new items, new embellishments. Seems it is never ending. And that is great.

Scrapbooking is a fantastic craft, and in my opinion, the best way to preserve memories for generations. As usual though, expense is always an issue. Although I do admit scrapbook supplies have gotten a lot more reasonable in price today than they were 5-10 years ago, sometimes they are still to expensive and if you don't have the income to accomodate, well, the scrapper you are makes you look elsewhere so that you can still preserve your memories for generations to come and satisfy your craft bug!
So where can you find affordable scrapbooking supplies? Well, you can always shop store sales and use coupons. I have found that to be a great way to get the more expensive stuff. Coupons can also work for the less expensive items too, but sometimes they just don't have what you want. So since scrapbooking is a craft, use your crafty mind and think about how else you can conquer expense to save your memories.
Where can you find really good things at a really low price? Yard sales! Yes, that's right, yard sales...or garage sale, estate sales or rummage sales. These ales are a treasure trove for craft supplies! "One man's junk is another man's teasure" - really speaks loudly for the crafter.
What to Look for To Find Scrapbook Supplies
Clothing: One of the most popular items at any yard sale is out-grown clothing. Especially baby clothes. Those little tikes out grow the clothes faster than they wear them out which means the clothing is still in great condition. Look at the buttons. Cute little, whimsical, pastel buttons. Buttons are a great scrapbook
embellishment. Cut them off the clothing item and glue them on with glue or pop-dots - great for the "bulky" look. Also look at the pattern in the fabric and cut that pattern out - if there are little trains or ducks in the fabric pattern, cut them out and run them through a Xyron machine to put adhesive on the back and they secure neatly to the background paper! Makes the perfect fabric die cut! You can do this with any fabric pattern.
Older childrens clothing also has some finds. Jeans have those copper, western looking buttons - great for a masculine, outdoor-zy or western theme layout. Or even cut the pocket off a pair of denim jeans and use the pocket as a pocket on your layout! Look at clothes that have name brands displayed on the front - great if you have a favorite brand you want to remember. Just cut the brand name off the article of clothing and use it as a die cut. Sometimes it is a saying like "I Love Roxy". Although a clothes brand, my grand daughters dog is named Roxy so I can cut that out of the shirt, run it through my Xyron and have a fantastic title for a layout about her and her dog! Look at collars - cute fringes or lacey collars- would make a great "border" to a photo. Appliques are also a fantastic addition to a scrapbook layout.

Other craft supplies: When I started scrapbooking 10 years ago, I had no help from anyone. My spending money was literally next to nothing. I started with photo square adhesives, a circle template and a scrapbook spiral album. But since I have been a crafter all my life, I had others supplies. Ribbons, threads, embroidery floss, fibers, buttons, appliques, yarns, beads, gems stones, rhinestones, jewelery pieces and charms were just some of the items I had. Granted, as I was just starting, I didn't realize I could use all these kinds of things, but now - boy, did I have a treasure trove in my craft closet! Look at any craft supply at a yard sale through the eyes of a scrapbooker - you'll be amazed at what you will find!

Books and magazines: Books are also a standard at most yard sales. I don't approve of destroying books, but at the same time, if the book holds a wonderful memory, I see no problem in preserving it for generations to come. Plus, you don't know that it won't get thrown away if it doesn't sell. Look at the books and see the pictures. Anything remind you of a favorite memory from your life? How about your child's life right now? For 10¢ you buy the book and cut out the item related to the memory. Instant die cut! Cut several images and organize them on the layout page to create a "scene" relating to the memory. Magazines are also great for this but you have to watch for acid in the pages. You can buy an acid-free spray and spray the magazine page. What I did was just insert the magazine page into a page protector and the page protector onto the scrapbook layout page.

Post cards and stationery: Not often as common, but out there just the same. Whether you use the post card as is or cut images from it, you have instant stickers! Cut theimage out, run it through a Xyron machine use acid free glue sticks or photo adhesive squares and you have a sticker!Add pop-dots for a 3-D effect! You can do the journaling on the stationery as it is or cut the designs from the stationery to use as you need.
Board Games: Scrabble has those wonderful small wooden tiles of letters. Each letter can spell out the title or a person's name! Monopoly money is a great embellishment for layouts themed for shopping, travel and other money related scrapbook themes. Even the board could be a great addition - if it is to thick to cut, just scan parts of it to make your back ground paper or to cut parts out for die cuts!
Holiday decorations: Tinsel, christmas cards, wrapping paper, gift tags, paper wall decorations, candy wrappers, window clings, glitter, silk flowers - just take look with a scrapbookers frame of mind and the possibilities will jump out at you!
Other things you might look for: Labels from jars - just soak them off. I'd love to have a label from Knott's Berry Farm jelly jar as Knott's was my families favorite place to spend Sunday afternoons as a kid - way back before it was an amuzement park and cost admission! Nick-naks that can be disassembled to get to the brand name or the image you want. Hand made things like embroidered towels, doillies or lace pieces. Use as is or cut off the part you need. And those School work books- a great "back to school" background paper is a page of math problems from a work book; you just add the photos and journaling!
So next time you see a sign that says "Yard Sale", put your scrapbookers thinking cap on and stop and go shopping!

Thursday, May 21, 2009

How to Use Vellum In Your Scrapbook Layouts

One of my favorite materials to use is vellum. It is a thin, semi-see-through paper. And there are so many uses for this! I always liked using it for the elegance and dimension it offers a scrapbook page. You can cut it, journal on it, tear it, fold it, punch it, gel pen it... and the list goes on. It is a fun material to use on your scrapbook pages and the ideas are endless! It isn't very expensive if you shop around. I'd shop for this on sale too. You can get vellum in clear white and many colors. I prefered to use the clear mostly, so I found a place that sold in bulk about got it for about 10¢ a sheet. Here are 3 different ways I have used it.

Scrapbook Layout Description

"Best Friends"

In this layout of my daughter and her best friend, I used wallet photos and camera photos. The background paper is a pale lavender floral print. I used purple cardstock for matting the photos. The title letters are also purple cardstock. I made the purple and vellum daisys using a extra large daisy punch with a button for the flower center. Some of the photos are matted, some are not.

Use Vellum to focus in on specific images.


In this layout, I didn't want all that background in the photos, but didn't want to cut the photos so that they were really small. They would have looked kind of lost amongst the large photos. So I used a circle Coluzzle template and cut the photo out with the face in the center. I then cut a circle matte 1/4" larger that the photo from purple cardstock. I cut a circle of vellum the SAME SIZE as the photo and using a circle punch, and precise measuring, I punched a large circle out of the vellum exactly where her face was on the photo and laid it on top of the photo.

NOTE: With vellum, you can't use glue on it or the glue shows through (I believe they now have a speciality glue to use just for vellum, but its just another expense that you can do without if you choose) So to secure the vellum circle to the layout so it doesn't slip off, I took 2 small rhinestones, and glued them on the top of the vellum. I then put glue BEHIND the rhinestones on the back side of the vellum and glued it to the photo. Now, I know that you aren't suppose to use glue on photos, but this small, tiny amount, it is my decision that it won't harm anything. It is only just a tiny bit to gently hold the vellum in place. I did this on both the vellum circles.

"Flower Girl
"
This was my son's wedding. I did the journaling on the computer and it is in the words of his little neice as she was his flower girl, but was quite thrown by the whole thing! So I typed the journaling in her words on vellum. I attached it to the background paper simple by adding a piece of mulberry paper, crumbled it for effect and a button to bring it all together. I glued the mulberry paper to the vellum and then used photo adhesive squares on the back of the vellum UNDER the mulberry paper embellishment. You can read the journaling very nicely and the print background shows through just enough to bring it all together. A scrapbook layout to remember!
Use vellum for journaling
You can use vellum to computer journal on. I love this feature. It just gives that bit of elegance, yet not over doing it. The journaling is on the vellum and then placed on pattern background paper so that the pattern shows through the vellum for a "muted" background design, but not over-taking the journaling. The journaling blends in more with the layout instead of being the most prominent on the page.


"The Kiss"

For my son's wedding, I wanted simple elegance. I used a love song by Garth Brooks (I think it was!) that they played at the wedding and just typed it on white cardstock. I secured it to the layout with silver stickers.

Use Vellum for elegance and to highlight the theme of the layout.

I cut vellum the exact same size as the photos and then with precise measuring, I used a Coluzzle oval template to cut out the part to just focus on the kiss. One oval is horizontal the other is vertical. I secured the vellum with metallic silver heart stickers. The vellum creates 2 views of the same photo - one is focus on the kiss, what the layout is about, and then allows you to still see their attire through the sheer vellum. Now when you look at this layout, you focus on the kiss and feel its meaning. Simple elegance.

And you can use this technique on adult or children theme photos/layouts. Another good idea is to use this technique for school pictures - cut the circle out of the vellum for your child's face, but yet you can still see the rest of the class through the vellum. Or a family gathering or birthday- circle out the birthday person's face for focus, yet you can still see the rest of the family!
All these layouts are quick, easy and inexpensive.